Below is a precise method of statement covering the GRP lining and ladder installation in water tank.
There shall be many other sections like scope of work, responsibilities references etc. but we have given below only the specific installation steps.
Following tools shall be arranged before starting the GRP lining and ladder installation works.
- Mohair rollers
- Steel Rollers
- Brushes
- Scrappers
- Grinders
- Drills
Storage and Handling of GRP Material
CRYSTIC GELCOAT 65E or any other grp lining material shall be stored in the dark and suitable closed containers.
The storage temperature should be less than 25 degree centigrade where practical, but should not exceed more than 30 degree as per manufacturer recommendations.
Fiberglass (POLYMAT) shall be stored in cool and dry environment and the storage temperature shall be as recommended by the manufacturer.
All the materials contained in the containers shall be opened only just prior to the time of application.
SURFACE PREPARATION:
The concrete surface / substrate shall be clean and free from contamination such as dust, oil, grease, organic growth and release agents etc.
All loosely adhering particles such as mortar and cement laitance shall be removed.
Surface would be cleaned by wire/stiff brushing and finally soft brushing or compressed air.
The surface shall be free from standing water.
Pipes/ Sleeves, conduits, drains or any other penetrations shall be in place, secure and protected prior to the grp lining application.
The adjacent areas not to be coated shall be protected and particular care shall be taken to prevent staining.
Application of GRP Lining System shall be done by experienced personnel and as per manufacturer recommendations.
All joints to receive sealant shall be indicated on shop drawings.
The joints shall be sealed in compliance with shop drawings and as per the client/consultant approval only.
All the joints to receive sealant shall be a minimum of 6mm wide and 6mm deep, unless otherwise approved by the consultant.
The joint preparation and application of sealant shall be in strict accordance with manufacturer written recommendation and project specifications.
Adequate ventilation shall be provided inside the water tank.
Safe access / egress shall be provided during the GRP lining application.
Application Method of GRP Lining
The working area of the concrete wall surfaces will be primed with one coat of Ortho Resin or equivalent.
Apply one layer of chopped strand glass fiber mat 450 gram/m2 (Polymat) an impregnated with Ortho resin at an approximate ratio of (2.5~3) : 1.
Then the balance total laminate will consist of 4 layers x 600 grade/sqm chopped strand mat (Polymat) impregnated with Ortho resin (Crystic 125) at a ratio of about 2.5 ~3 : 1 .
All works done to be protected from dust and sun light and allow drying and curing minimum for 24 hrs.
This procedure is adopted for the walls and floors.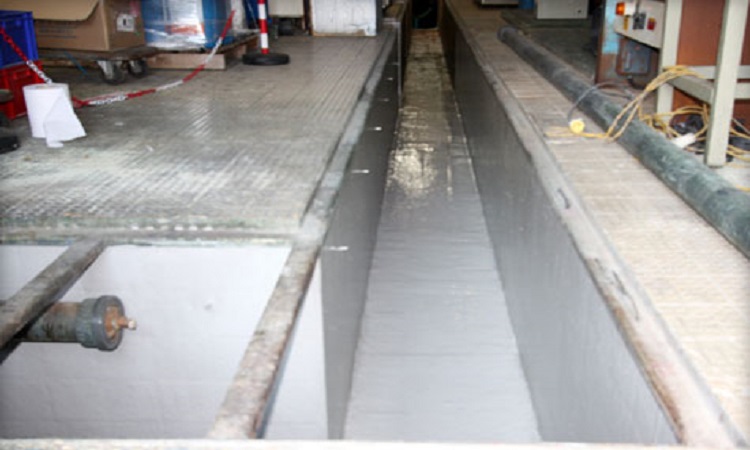
A final coat of Gelcoat 65 E will be applied on the lining to cover any exposed fiber.
All laminate to layers joints will have fiber overlap of 50 mm.
A maximum total thickness of 7mm of GRP lining will be followed.
After completing all the walls, all scaffolding will be removed then make lamination for the floors area following the same procedure mentioned above.
After completing all the work, allow for drying then inspect all areas of grp lining.
In case any visible defect is noticed, it will be grinded/ roughened and GRP overlapping at least 20 x 20 cm will be applied in a manner similar to the above.
Excess debris and products shall be removed from the tank/construction site.
Water test will be conducted once GRP is fully cured by filling water for 24 hours.
CLEANING:
After final completion of grp lining installation the entire area shall be thoroughly cleaned down as per manufacturer’s recommendations.
Clean fiber bristled brushes shall be used for cleaning.
No chemicals, scrapers, or other tools which would affect finished surfaces would be used for cleaning.
INSTALLATION METHOD OF RPEFABRICATED GRP LADDER
The fixing/installation detail of GRP Ladder will be followed according to shop drawing and as per manufacturer’s recommendations.
Mark the holes then drill and clean them.
Hammer the both shields internal thread sleeve until resting completely inside the holes.
The shield should reach full load bearing all the required capacity.
Rest the ladder on the floor then make two holes in the ladders at the same location of the both shields.
Fix the SS bolts through the two holes and in the shields, then tie the bolts by spanner (bolts are above the water level).
Grinding the two legs of the ladder for about 10 cm and the floor all around to rough it.
GRP lamination of the grinded zone to be done.
Let the lamination dry within one hour, and then the ladder is ready for use.
Discover more from Project Management 123
Subscribe to get the latest posts sent to your email.