The objectives of this method statement is to briefly describe the major activities and set inspection milestones for irrigation system installation.
Purpose of this procedure is to establish general guidelines addressing major requirements that are necessary to ensure that irrigation work conforms to the project drawings, design and specifications.
This method statement explains and covers the installation and commissioning of an automatic irrigation system for proper irrigation of all plants and landscaped areas.
Irrigation system installation shall be done as per the project landscaping design, specifications and approved drawings.
The installation shall be done to achieve optimum irrigation efficiency and to meet the requirements of landscaped area.
Roles & Responsibilities
Project Manager is the over-all responsible for the project execution in compliance with quality plan and Safety plans.
Construction Manager shall arrange all materials, equipment, safety related items & manpower for the item & direct the Site Engineer to act for the smooth process in the execution of irrigation works.
QA/QC engineer shall ensure that the work is carried out and the requirements of this method statement are followed. Check and maintain certification records/testing acquired for this activity.
Senior HSE Engineer will monitor and implement all HSE related issues. He shall ensure that all necessary requirements regarding health, safety and environment concerns are met and adhered to. The HSE Engineer shall ensure that precautionary measures from method statements are strictly adhere prior to starting any site operations.
Site Engineer shall ensure that all works are carried out according to approved procedure. He shall instruct Foreman for the sequence of works related to irrigation works.
The Third Party Inspection or Testing Agency is responsible for carrying out testing related to irrigation works as applicable.
Tools & Materials Requirement
- Leveling Device
- Hand Tools
- Hammer
- Hand Saw
- Spirt Level
- Pipe Wrench
- Spanners
- UPVC Pipes & Fittings,
- Solvent cement & Cleaner,
- Single Cable 14 AWG,
- Warning Tape,
- Valve boxes & Round Boxes,
- LDPE Pipe 16 mm,
- PE Drip Tube,
- Solenoid Valves,
- Irrigation Controller,
- Air Release Valve ,
- Pump Set
Material Storage / Delivery / Handling
Only approved material shall be used. Delivered material shall be stored at site stores and shall always be subject to client’s representative inspection. Special shaded pipe racks shall be constructed to store pipes. Fittings and irrigation materials shall be stored inside containers that will be kept closed at all times.
Transportation
All materials will be transported to site with due care and protection as per manufacture’s recommendations and will never be dragged or dropped on the ground.
Material Inspection
All materials received will be inspected for make as per approvals, size and damages. Materials found unsuitable shall be removed from site.
Protection
All materials shall be shipped or otherwise conveyed in such a manner as to assure no damage. All boxes shall be securely sealed and clearly marked with the name of the manufacturer. All pipes shall be protected from crimping, crushing and splitting. All non-metallic system components shall be protected from sunlight exposure as per manufacturer’s recommendations.
Works and materials shall be protected from damage during storage, handling and construction. Particularly, non-metallic pipes and fittings shall be protected from direct sunlight during storage. Facilities of the necessary dimensions shall be provided and maintained for storage of all non-metallic irrigation materials in their entirety. All non-metallic materials shall be handled carefully and stored under cover to avoid damage. Pipes that have been damaged or dented will not be used in this work and to be removal from the site immediately.
Openings into the system, apparatus and equipment shall be securely covered, both before and after being set in place, to prevent obstruction in the pipes and the breakage, misuse or disfigurement of the apparatus or equipment.
Barricades, guards, warning signs and lights as necessary or required, for the protection of the public and the work force shall be provided.
All open ends shall be close by end cap provided by manufacture /supplier.
Protection of existing Utilities
The location of the existing underground utilities shall be determined and the works performed in a manner which will avoid possible damage. Hand excavation, as required shall be carried out to minimize the possibility of damage to existing underground utilities.
Irrigation System Installation
Setting Out
Check and verify that the approved shop drawings with correct revision are followed while taking up the work.
Before starting work on irrigation systems, the Surveyor shall carefully check all grades to determine that work may safely proceed, keeping within the specified material depths.
Irrigation system contractor shall verify all horizontal and vertical site dimensions prior to staking.
Mark and line out route and locations of Sub-Main and lateral lines (Secondary Irrigation Lines).
All changes shall be recorded on daily basis on the “As-Built” work sheets.
Pipe Laying and Jointing
Solvent Welded Joints
Chamber spigot ends of all pipes to a depth of half the wall thickness at an angle of 15 degrees. Care should be taken to cut the pipes perpendicular to the axis of the pipe.
Remove all debris from the pipes prior to assembly of joints. Ensure that the prospective joints are free from moisture.
Clean the joining surface with a light PVC cleaner.
Apply a light application of solvent cement to the inside of the fittings followed by a slightly heavier application to the exterior of the pipe.
Insert the pipe into the fitting, with a 1/8th turn to distribute the solvent cement and the excess on the exterior of the pipe wiped clean. Care shall be taken to see that excessive quantities of cement are not forced into the interior of the fittings. Ensure that pipe enters at least 90% of the socket depth in all circumferences.
In order to take the fullest advantage of the flexibility of the pipe lines that are joined by solvent welding techniques, pipes should be joined at the trench side and then snaked into the trench.
Location of Irrigation Lines
Generally, where the irrigation distribution or secondary main is running landscaped areas the pipe will be directly buried in a clean sand bed with a marker tape above. At road junctions or other locations where pipes cross the road it shall be contained in a direct buried PVC sleeve.
The sleeve shall extend beyond the road crossing by at least one meter on both sides. The size of the sleeves shall be as per the approved shop drawings.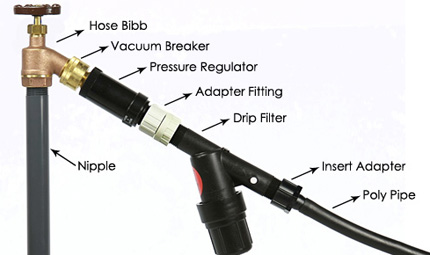
Header mains shall be fixed in the basement first floor up to second floor by using hanging clamp with rubber.
Concrete encasement shall be provided where pipes passes under roadways and/or as specified.
Irrigation Pipe Placing and Laying
The pipe shall be fixed in the basement first floor up to required floor / areas by using clamp with rubber that to prevent the vibration of the pipe. The clamp is female threaded size 10mm to hanging this clamp with the pipe in the concrete slab in the basement by using GI threaded part (as per the site condition). This threaded part shall be fixed in the concrete slab by using fixed bolt.
Jointing: Pipe joints of uPVC shall be installed in accordance with recommendations of the manufacturer. Excess jointing material shall be removed.
uPVC male adaptors with specified threaded joint compounds to make connections between plastic pipe and valves shall be used as detailed, and tightened with light wrench pressure.
Concrete Thrust Blocks shall be constructed on main pipelines at all changes in direction or size. The thrust blocks shall be un-reinforced concrete and shall have a minimum dimension of 300mm. The pipe lines shall be located centrally in the thrust blocks.
All primary and secondary irrigation piping shall be buried to the depths as shown on the drawings.
Closing of Pipe and Flushing Lines
Closing: Openings in piping systems shall be capped or plugged, leaving caps and plugs in place until removal is necessary for completion of the installation. Dirt and debris shall be prevented from entering pipe or equipment.
Flushing: All pipes and tubing shall be thoroughly flushed out.
Irrigation Pipes Pressure Testing
Prepare for hydrostatic testing of the main line only. Slowly fill the pipe with water, taking care to evacuate all entrapped air in the process. Pressure Test of main lines shall be 7 bar (1.5x of operation pressure) for a period of 6 hours. The pipe length to be tested shall be blanked off using an end caps with adapter facilities for connection of test equipment.
Install test heads with provision of bleeding air vent at the highest point.
Install test head with provision of filling water at the lowest point of the pipeline. Calibrated pressure gauges shall be installed at 1 end of the pipeline.
During the water filling all air in the pipeline shall be expelled through the air bleeding nozzles installed at the highest points.
Request for inspection of the pressure test by the Consultant or Inspector and get the same witnessed.
Complete the backfilling leaving the location of end capped solenoid valves risers exposed.
Testing of pipes shall be carried out for main line only.
Site Equipment Installation for Irrigation Works
Solenoid Valve Assembly:
Shall be installed in the positions as indicated in the details, Solenoid Valve shall be as per the approved material, and the installation will be as per the approved installation details drawing.
Solenoid Valve assembly is consisting from Solenoid Valve and bronze gate valve is connecting to it by using GI x nipple.
Solenoid Valve, bronze gate valve and necessary fittings will be assembled in valve box fixed in the sweet sand area complete with all civil work like block foundation and primer bitumen and plasters
Gravel ( 20 mm to 30 mm ) will be furnished inside the round box in layer ( 5 cm to 10 cm)
Connection between Solenoid Valve assembly and irrigation main line will be by using uPVC pipe as raisers and, upvc male adaptor and upvc union before and after solenoid to allow easy removal of the solenoid in maintenance purpose.
Valve boxes installation (for valves & Cables)
Valve box shall be installed as detailed and where indicated on the drawings (shall be only located in soft landscape area).
All valves and valve assemblies shall be mounted in boxes as detailed. Valve boxes containing the assembly shall not be placed closer than 300mm to paved areas.
Pull boxes to be installed as detailed and specified in the approved shop drawing.
The top of all boxes shall be set as per the approved shop drawing in a neat and orderly fashion.
Place the boxes parallel to paving, curbs, walls or similar structures and where more than one box, parallel to each other.
All box locations shall be reviewed with the engineer prior to installation of valves.
Valve boxes shall not rest on or come in contact with the valve, piping, hose or conduit.
Isolation Gate valve Installation
Gate Valve shall be as per the approved material, and the installation will be as per the approved installation details drawing.
Isolation Gate Valve assembly is consisting from bronze gate valve in 1.5” diameter or smaller.
The connection between Isolation Gate Valve assembly and irrigation main line will be by using upvc pipe as raisers and, upvc flange adaptor and upvc union before and after gate valve to allow easy removal of the solenoid in maintenance purpose.
Air Release Valve
Air Release Valve shall be as per the approved materials, and the installation will be as per the approved installation details drawing.
Air Release Valve assembly is consisting from Air Release Valve-1” and bronze gate valve 1” is connecting to Air Release Valve by using GI x nipple.
Air Release Valve ,bronze gate valve and all necessary fittings will be assembled inside valve box fixed in the sweet sand area complete with all civil work like block foundation and primer bitumen and plasters.
Gravel (20 mm to 30 mm size ) will furnish inside the round box in layer (5 cm to 10 cm)
The connection between Air Release Valve and irrigation main line will be by using uPVC pipe as riser and uPVC male adaptor 2”.
All material shall be as per approved material submittal.
Installation of Electrical Work for Irrigation
The Contractor shall provide, install, test and commission all items of electrical equipment associated with the irrigation systems
All electrical works shall be in accordance with the BS, IEC and local regulations.
The irrigation system shall commence at the controller which shall be fitted into a junction box in a dwarf type distribution cabinet with a bolt down foot for mounting on a pre-formed concrete base. All incoming and outgoing cables shall be from below ground level.
The cabinet shall have a hinged lockable opening door to provide full front access to the controller and equipment and shall be sized according to the equipment being installed.
All terminals shall be of the crimped spade type with insulated grip. At all connection locations 150 mm of “slack” shall be provided.
Conductor markers shall be used throughout which shall clearly indicate the circuit reference or number. These shall be white plastic with black letters or numbers and of the type which acts as a sleeve over the conductor insulation.
Connections onto valves shall be made in a below ground PVC resin filled moulded waterproof connector with integral wire clamp.
Valve control cables from irrigation controller to remote control valves shall be double strand twisted, solid conductor AWG-UF encased in conduit pipe. Wires shall be sized in accordance with the specifications and Drawings. Wires shall be a different color for identification. Control cables (Wires) shall be installed in conduit pipes as per approved shop drawings.
In Line Drip Tube Installation
Drip lines shall be carefully uncoiled and laid position without kinking. Any kinked section shall be cut from the line and subsequently rejoined with a compression socket.
Drip lines shall be snaked as required for minimum coverage without the use of compression fittings. Sharp bends shall be avoided where there is a likelihood of inline drip tube installation.
After spreading the lines, the connection o the polyethylene riser should be done as per the approved typical drawing.
Polyethylene stakes should be used in order to fix the tubes. Polyethylene figure eight will be used at the end of the line.
Irrigation Satellite Controller Requirements
The irrigation controller shall have the following features:
The automatic irrigation controllers shall be of an advanced commercial design, with a large, backlit, 8 line by 20 character display, and user-friendly dial-and-button type programming.
The controller shall have a removable face pack (containing the user interface and all program memory) which can be easily removed without tools for programming and diagnostics outside the controller enclosure.
The controller face pack shall have non-volatile memory, with 9VDC Battery power to enable programming when removed from the enclosure.
The controller interface shall have an Info button to provide text help instructions for each dial position and the controller shall also have two independently programmable Pump/Master Valve outputs, which may be configured as either Normally Open or Normally Closed.
Pump/Master Valve activation combinations shall be programmable by station; each station may have one, two, both, or neither P/MV output configured whenever the station is activated for any reason. Each Pump/Master Valve output shall have a capacity of 0.325 A @24VAC.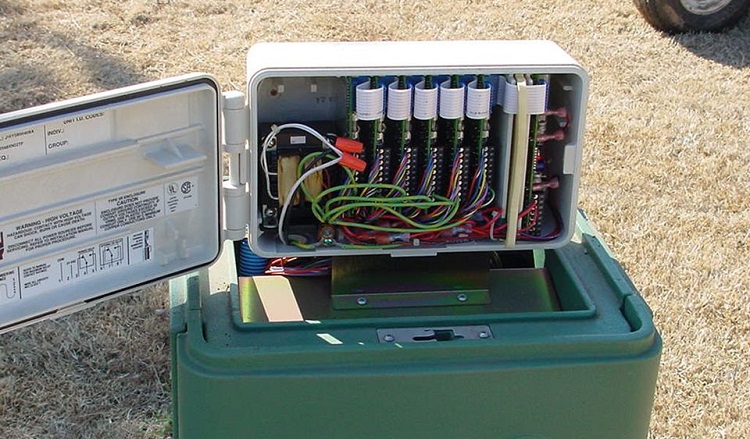
The controller shall have an internal 120/230 VAC transformer at least 120 volt-amp capacity, and shall have sufficient output capacity ( 4A @24V secondary) to operate up to 14 standard 24 VAC solenoids (12 solenoids plus 2 Pump/Master Valve outputs) simultaneously.
For primary electrical wire sizing assume 2 amp max in 120V installations,1 amp max in 230V installations.
The controller shall have a self-diagnostic circuit breaker to prevent harmful overloads due to field wiring.
The controller shall have a replaceable fuse, 6x20mm, 2A, 250V fast blow, and shall be supplied with one spare fuse.
The irrigation controllers shall have 6 automatic programs with 10 automatic start times, each. Start Times shall be set in one-minute increments, and may be set in 24-hour clock or AM/PM time formats.
Each program and station may be uniquely named with alphanumeric character.
Automatic programs shall be individually configurable for Overlapping, Stacked, or programmable Smart Stacked operation (including SSG/Smart Stack operation if this feature is used). Smart Stack operation shall permit the operator to specify the number of programs permitted to overlap before Stacking commences.
Automatic programs shall have programmable water day schedules with optional Day of Week, Interval Day (1 to 31 days), or Odd or Even days, by program.
Automatic programs shall have user-programmed Non-Water windows to except certain time windows from watering, regardless of the water day schedule.
Automatic programs shall also permit the designation of non-water days, even when Odd/Even or Interval Day patterns have been set.
Non-water window violations shall be detected and the operator shall be warned when programming irrigation into non-water windows. If the program changes are kept despite the warning, the irrigation shall automatically stop when the non-water window is reached.
The controller shall permit run times per station start of between 1 second and 6 hours, in one-second increments.
Automatic irrigation shall be capable of Cycle and Soak programming, by station, to minimize runoff.
The controller shall also offer programmable delay between stations of up to 6 hours in one second increments.
The controller shall have programmable Rain Shutdown delay of up to 31 days.
Individual programs, or the entire controller, may be adjusted with Season Adjust from 0 to 300% in one percent increments.
The controller shall have 4 additional Custom Manual programs for Specialty applications that allow any stations to run in any order, with programmable pauses between stations. Custom Manual programs shall not run automatically but can be started by the operator at any time from the dial controls.
The controller shall have a Quick Check test program, permitting all stations to run sequentially for a user-entered period of time, programmable in one-second increments up to 10 minutes each, for system start up and diagnostics.
The controller shall have a one button manual station advance in test mode for quick diagnostic checks.
The controllers shall permit stations to be grouped into simultaneous Station Groups (SSG) for simultaneous activation and programming, in clusters of 2 to 4 stations. SSGs shall be used to reduce programming time, and to consolidate irrigation times when flow and pressure permit. SSGs shall be included in automatic programs with a single run time, in the same fashion as individual stations, but representing the electronic group of similar stations. SSGs may also be assigned alphanumeric names.
The controller shall permit connection of up to 4 switch closure sensors, with programmable response to each sensor, by program. Sensor response may consist of a) Suspend, wherein the controller ceases irrigation, but continues counting “irrigation time” so that it resumes where it should be with no violation of the end of the water window, or b) Pause, wherein the program ceases irrigation but will resume where it left off at time of the Pause input. Each program may respond to each sensor regardless of other programs’ status or responses.
The controller shall permit connection of a true flow meter which connects via the master power module of the controller (or via the two-wire path in two-wire decoder configurations), and which is calibrated by the operator for the pipe diameter in which it is installed. The flow meter shall measure actual flow in gallons or liters. The controller shall have a learning mode in which the controller operates each single station for a short period, learns the actual flow for each station, and stores the information internally by station.
When the learned flow is exceeded during normal operations the controller shall record a flow alarm event, cease irrigating the station or stations contributing to the high or low flow readings, and resume irrigation with any stations which do not cause alarms. The controller shall have the ability to determine high or low flow conditions when multiple stations are operating, and shall perform diagnostics to identify stations which contribute to the problem flow. Allowable limits and duration of incorrect flow shall be preset, but reprogrammable by the operator for unique local conditions. The flow meter shall be a Hunter Industries HFS in an appropriately sized FCT fitting. It shall also be possible to except certain stations from flow monitoring, for non-irrigation devices.
The Controller shall permit the connection of Hunter Et-System for weather –based irrigation scheduling.
The basic controller shall have maximum capacity of 12 stations.
The controller shall be packaged in a powder-coated metal wall-mount enclosure, with an optional powder-coated steel pedestal mount. The controller shall also be available in a pre-assembled plastic pedestal enclosure. All enclosures shall be suitable for outdoor installation.
Each station output shall have a capacity of up to .56 A @ 24VAC. 29.Station expansion shall be effected via 6-station modules requiring no tools to install, and only a screwdriver to attach field wiring. All station output modules shall feature transparent plastic housings with colored indicator LEDs showing station status (OK, Running, Faulted). Station output modules shall be furnished with built in, fully encased Metal Oxide Varistor (MOV) surge protection components. Extreme Service (AGM600) output modules shall be furnished with fully encased heavy-duty surge protection, consisting of spark gap and induction coil protection on each output.
Earth grounding shall be connected via a factory supplied copper ground lug inside the controller, for connection to earth ground hardware via 6 AWG(4mm dia.) copper wire (see ASIC Earth Grounding Guideline 100-2002 for details of earth grounding irrigation control systems available online at www.asic.org). Ground wire shall be extended underground, at right angles to any communications wiring, to approved direct burial earth grounding hardware at least 6 ft./2m from the controller location. Earth Ground shall be have an impedance of 10 Ohms or less, or shall meet the standards of the Earth Grounding Guideline cited above.
The controllers shall be equipped with an integrated, pre-wired SmartPort input to permit connection of wireless remote controls and other devices as specified by the manufacturer. Wireless remote control shall permit individual start of individual stations and Programs, and shall also enable remote shut down of all irrigation at the controller.
The controller shall be adaptable to compatible computerized central control systems through an optional communications module, with a selection of common communications media including hardwired cable, UHF radio, dial-up modem, and cellular telephone. When configured for operation within a central system, the controller shall feature full two-way communications with the central computer. The compatible control system shall be Hunter Industries Model IMMS 2.0 Irrigation Management and Monitoring System.
The controller shall be installed in accordance with the manufacturer’s published instructions. The controller shall carry a conditional five year exchange warranty. The automatic controller(s) shall be the ACC series controller as manufactured for Hunter Industries.
The controller shall be UL and c-UL listed. The controller shall be CE and C-tick approved and shall have WEEE recyclability markings as required.
The wall mount controller shall be model ACC-1200.
Irrigation Pump Set Requirements
CONTRACTOR will supply and install Centrifugal pump ( 1duty + 1 standby ) shall be in-line vertical, multistage, having stainless steel body and cast iron base.
The pump section (shaft, impellers, guide vanes and chambers) shall be of stainless steel.
The inlet and the outlet shall be flanged PN 16.
Motors shall nominally 2900 rpm – electrical motor.
Irrigation Lines/System Testing
Purging
Immediately prior to hydrostatic testing, all irrigation lines shall be thoroughly purged of all entrapped air.
Mainline may be tested in sections as applicable.
Water shall be discharged from a single outlet by manipulation of isolation control valves and installation of temporary caps.
Water shall be introduced into lines to be tested at full operating head and the water flow at end discharge point, and observed until all air and residual debris has been expelled from the line.
Initial System Test
Test shall be made only after completion of the above operations and not until at least seven days after the last concrete thrust anchor block has been cast.
Contractor shall supply all testing material and equipment, including all caps, valves, pumps, tanks and gauges as required.
Pressure gauges shall be dual reading in bar and PSI units. Calibration shall be such that accurate determination of potential pressure loss can be ascertained.
The section of the main pipeline to be tested shall be filled with water and all air expelled. After the main pipe line has been completely filled, the pressure shall be steadily and gradually increased until the specified test pressure has been reached.
Length of tested pipes shall not exceed 500 lm.
The pipeline shall be maintained at 9 bar pressure for a minimum 6 hours for the mainline.
When testing the irrigation lines from the valves, discharge devices shall be replaced with temporary plugs or caps.
All trenches with pipe installed shall be immediately backfilled with preliminary backfill material sufficient to prevent arching or slipping under pressure. All joints, fittings and connections are to remain exposed until successful completion of hydrostatic testing.
Other than for preliminary backfilling over the pipes, no work shall be covered before it has been inspected, tested and approved by the Engineer.
During the tests, all exposed couplings, fittings and valves shall be carefully examined for defects and leakage. Leaking pipes, couplings, joints fittings and equipment shall be repaired or replaced and the section re-tested as previously specified.
Upon receipt of the approval of the Engineer to proceed, the remaining backfill shall be placed with warning tapes and compacted by water compaction.
Flushing of Irrigation Pipes
On completion of the irrigation piping system test, the system is to be thoroughly flushed, the velocity of water being at least 3m/s.
Should the main water supply be unavailable or inadequate for this purpose at the time of flushing, then a swab of adequate size shall be used to remove all foreign matter from the pipeline.
This process shall continue until the pipeline is completely clean.
Each control valve shall be opened separately and the terminal systems also thoroughly flushed.
After completion of flushing, the inline drip tubes and other discharge devices shall be fitted.
Operation Test: After the hydrostatic test, inline dripper lines shall be installed and the system completed and tested to demonstrate functional efficiency.
This shall be prior to bury the laterals 10cm – 15cm below ground level.
The lines shall be operated for a period of 6 hours, not necessarily in one continuous period, and inline drip tubes checked for satisfactory operation.
Any faulty / blocked Inline dripper portion shall be replaced and approved.
Discover more from Project Management 123
Subscribe to get the latest posts sent to your email.