This method of statement is applicable for the installation of Natural Gas System, pipe work, distribution lines, gas branches inside the retails of the Building (regulators, gas meters, valves, etc.) for the building project.
Project manager will have the overall responsibility of the Project for execution, quality and safety. Also he will maintain the planning progress and coordination of works with Main Contractor/ MEP Subcontractor.
References and standards:
- Institution of Gas Engineers and Managers – IGEM
- National Fire Protection Association – NFPA
- NFPA 58
- IGE / GM / 8 & 13
Tools & Equipment’s
- Electric Arc Welding Machine
- Grinding Machine
- Drilling Tool and Accessories
- Cutting Tool
- Threading Machine
- Measuring & Marking Tools
- PPE (Gloves, Goggles, Hard Hat, Etc.)
General Gas Piping Installation Requirements
All material received on site will be inspected, handled, and stored upon receipt in accordance with the project management system procedures.
Inspection/construction/testing will be carried out in compliance with the MEP Sub-Contractor, Main Contractor and Client’s safety manual.
Received material will be checked prior for conformance and approval will be given by the store keeper or Site Engineer before offering inspection.
Inspection and Testing shall be conducted by the site QC inspector and be coordinated with the Main Contractor and Consultant.
Verification, inspection checklists and tests will be verified, recorded on approved forms and signed by site QC inspector and consultant.
Hot Work Permit must be obtained prior to proceed for hot works on the project site. Hot Work must always have fire protection equipments. (Fire blankets & extinguishers).
Obtain working permit when working on shafts, and scaffold must be provided with tagging to identify it is secured, provide the area with adequate ventilations and lightings.
MSDS must be strictly followed.
All test equipment will have valid calibration certificate.
Pre Installation of Natural Gas System Procedure
Ensure that approved material required to carry out the work is available at site.
Prior to commencement of work, areas and access will be inspected to confirm that site is ready to commence the work.
Before taking the materials from stores, pre inspection will be carried out for the materials.
All relevant documentation (drawings and materials) for a particular section of the works will be checked prior to commencement of work.
The Site Engineer/Supervisor/Foreman will give necessary instructions to Technicians and provide necessary construction/shop drawings.
Site Engineer/Supervisor/Foreman will also check that tools and equipment are available and in compliance with contract requirements.
Ensure that the construction power for electrical equipments is provided by the main contractor near to the work place.
Safe and tidy work place, clear access to the work place & modes to shift material.
Natural Gas Piping Installation Procedure
Below mentioned installation procedure will be used or implemented as/if specified and usable in site wide pipe installations as specified in specifications, Local code requirements and/or approved shop/detail drawings.
Use of Grinding Machine:
Every abrasive wheel shall be mounted properly.
The safe working peripheral speed of grinding shall not be exceed
A suitable guard shall be provided and kept in position at every abrasive wheel in the motion.
Where work piece rest is provided, it shall be:
- Properly secured
- Adjusted as close as practicable to the wheel
- Adequate eye protection shall be provided and used by workman
- Abrasive wheel should be mounted, balanced and dressed by persons trained and experience in such work
Welding and Cutting Requirements
Welding work safety and fire protection to be implemented without exemption.
All the welding and cutting machine wiring shall be of a completely insulated, flexible type, capable of handling the minimum current requirements of the work in progress.
Pipe line containing gases or flammable liquids or conduits containing electrical circuits, shall not be used as a ground return.
Ground connection shall be inspected to ensure that they are mechanically strong and electrically adequate for the required current.
Welding machine that uses 220V shall be inspected by Site QC/Safety from Main Contractor and shall have the necessary permit before put into operation.
Safe Means of arc welding and cutting
When electrode holders are to be left unuttered, the electrodes shall be removed and holder shall be placed or protected.
When an arc welder or cutter has to leave his work or to stop work for any appreciable length of time, or when the arc welding or cutting machine is to be removed, power supply shall be switched off.
All arc welding and cutting operation shall be shielded by non-combustible or flame proof screens, which will protect the employees and other persons working in the vicinity from the direct rays of arc.
Adequate mechanical fumes extraction and forced ventilation shall be arranged whenever work does not take place in open air.
Employees performing any type of welding & cutting shall be protected by suitable eye, face, hand, body, foot and respiratory protective equipment (if applicable).
Use of Hand Tools and Power Operated Tools
All hand power tools and similar equipment used at the site shall be maintained in a safe condition. As per site requirement, all power operated tools shall comply with the 220 or 110V capacity.
When power operated tools are designed to accommodate guards, they shall be equipped with such guards when it is used. Belts guard’s shaft pulleys, sprockets, spindles, drums, fly wheels chain or other reciprocation, rotating or moving parts of equipment shall be guarded if such part are exposed to contact by employees or otherwise create a hazard.
The Contractor/Sub-contractor shall not issue or permit the use of unsafe hand tools. A wrench including adjustable, pipe, end, and socket wrenches shall not be used when jaws are sprung to the point the slippers occurs. The wooden handle of the tools shall be kept free of splinters or cracks shall be kept tight in the tool.
Electrical power operated tools are either to be of the approved double insulated type or grounded and shall comply with the site voltage requirement.
Installation of Pipe Risers / Laterals
After inspection/approval of the delivered carbon steel pipe to the site, it should be cleaned and painted with Grey primer paint at least 2 coats.
End cap of pipes should not be removed to maintain the interior of the pipe clean, sanitary and free from foreign matter.
Use specific equipments, if necessary, in handling and delivering of pipe from storage to floor level such as chain blocks, crane, etc.
Examine each length of pipe before connection. Cut according to specified size.
Grind the pipe ends of the two carbon steel pipes according the Welding Procedure.
Remove any dirt or obstructions or burrs left by cutting/grinding tool.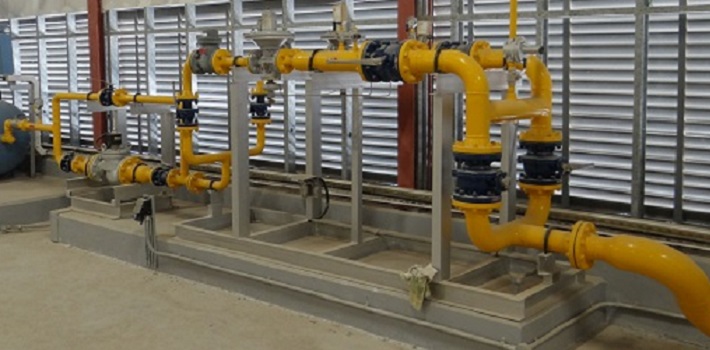
Before being placed in position, the pipe fittings and accessories shall be cleaned and shall be maintained in a clean condition.
Apply the top coating two coats (Canary Yellow color for identification of gas pipes) as per required thickness. Top coating provides corrosion protection for steel pipes and fittings. Mark the direction arrows to indicate the flow of gas in the system.
Joining the Pipes
Position each pipe to be joined.
Tac weld should be done to make sure that the pipes are aligned according to the desired position (i.e. horizontally straight etc…).
Use spirit level bar to make sure the pipes are aligned.
Welding according to WPS standards and code of practice.
After cooling the joined portion of the pipe, steel wire/file brush should be used to clean the said portion.
After cleaning the weld portion, primer paint followed by top coat should be done to prevent pipe from corrosion.
When the work of installing pipe is not in progress, all openings into the pipe and the ends of the pipe shall be kept tightly closed.
The supports must be of adequate strength and quality, and located at proper intervals, so that the piping cannot be moved accidentally from the installed position.
Lateral piping after the top coat for the desired length of the pipe, rubber spacer will be assembled in the outer diameter of the pipe, exact number to be determined / inserted every 2.5 meters.
Insert the carbon steel pipe (carrier) and rubber spacer assembly inside the containment pipe.
Make a small cut on the rubber spacer allowing air passage in inserting the carbon steel pipe.
Fittings (i.e. 90 elbow) will be installed only after the carbon steel pipe inside the containment pipe.
Carbon steel elbow will be welded to the carbon steel pipe.
After cooling down, clean and paint according to the standard pipe painting procedure.
Split containment fittings will be installed (rubber spacer will not be installed in the fittings, only before and after the change of direction).
Close the split fittings by sliding the lock.
Coupler of containment pipe will be installed exact or near the area of two joined carbon steel pipe.
Venting of Pipes (NG) every end of Piping will drop inside open shaft and all of the containment Pipes were usually open ends excluding main carbon steel pipes. NG to be released to the atmosphere freely from the shaft according to manufacturer recommendations.
After all pipes are completely installed, Pre-inspection for installation will be done with the main contractor QA/QC & subcontractor QC engineers conformity approval report to be attached for the final Work inspection request to consultant approval.
Installation of Gas Meters
Read the meter badge data regarding Maximum Allowable Operating Pressure and capacity flow rate to be sure the meter meets the project requirements
Sight across both swivel flanges or test with a suitable bar to determine that they are nominally in the same plane and will not cause excessive strain on the meter or piping when the connection nuts are tightened.
Blow out the service lines before the meter is installed so that no dirt, debris or liquids of any kind can be carried into the meter when the gas is flowing in the line.
This can be accomplished by using an air compressor and directly pointing the hose to the piping before the gas meter inlet port.
Place a new connection washer (gasket) on each swivel pilot.
Support the meter so that both hubs are against the connection washers and run the connection nuts down hand tight.
Tighten the nuts to an appropriate torque for the connection size.
Check the system mainstream of the meter to be sure that all connections are made up and tight.
A good practice is to always pressurize the meter with the inlet valve. Apply soap solution or other good leak detecting liquid to the connection and check for leaks afterwards.
Installing Regulator
Verify that the regulator is rated for the system operating pressures and has proper connections and accessories for substitute natural gas.
Check and verify the high pressure gauge is suitable for the pressure of the system or cylinder.
Inspect the regulator and your system connections for evidence of contamination or damage.
Check how many ports are available in the regulator and check for markings for inlet port, high and low pressure gauge, etc.
Connect the high pressure port to the high pressure supply side of your system or cylinder valve and the low pressure port to the low or regulated pressure side of your system.
Securely tighten connection fittings in accordance to procedures recommended by appropriate standards.
Perform leak tests to verify there are no leaks to atmosphere or across the regulator seat.
Isolation Valve Installation
Prior to valve installation, all valves and mating flanges should be inspected to ensure gasket surfaces are free from defects.
The valve and line should be free from dirt and debris, which can damage valve seats.
Piping should be checked for proper alignment and appropriate supports. Valves should never be used to align or brace improperly positioned pipe.
Install valve into pipeline and tighten bolts evenly according to recommendations of gasket manufacturer and applicable standards.
Check the direction of pressure tightness.
Ensure that the operating handle is sitting flush with the top of the packing nut and the handle posts are aligned to assure proper rotation of the handle.
Do not tighten or otherwise adjust body bolts. Over tightening of one side may cause leakage and necessitate body seal replacement.
Check for connection leakages afterwards.
Installing Solenoid Valve
Prior to installation, all valves and mating flanges should be inspected to ensure surfaces are free from defects.
Remove protective enclosures from the pipe body.
Connect line pressure to inlet port. Check for any restriction on the outlet port side of the valve.
Mount the solenoid valve directly on piping using the specific joining method applicable to standards.
Do not allow foreign particles to enter valve.
Check for electrical supply conforming to nameplate rating.
Connect coil leads to the electrical circuit using standard electrical practices in compliance with standards.
Turn off electrical power before connecting the valve to the power source.
Check for connection leakages afterwards.
Discover more from Project Management 123
Subscribe to get the latest posts sent to your email.